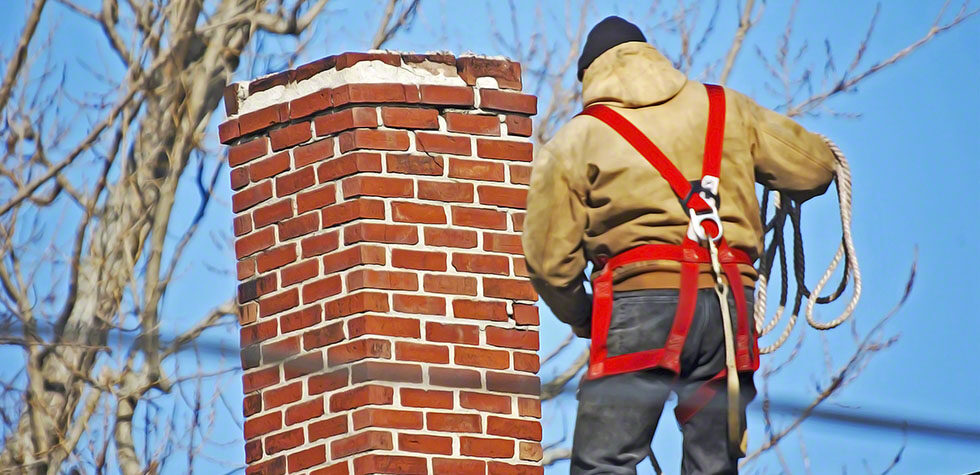
Chimney maintenance is of utmost importance if you want to keep your fireplace working safely and efficiently. While chimney cleaning once a year is required, you should not ignore a chimney inspection. An inspection will give you insight into the condition of your chimney and which repairs. Failing to do so can cause problems like crumbling bricks, moisture damage, and more.
An easy method of chimney repair is tuckpointing. Find out more about tuckpointing here.
What Is Chimney Tuckpointing?
Chimney tuckpointing is the process in which the mortar between the bricks is removed and filled with new mortar. This keeps the chimney structurally stable and the bricks don’t shift due to the insufficient mortar between them.
When a chimney is built, mortar is applied sufficiently. Over time, water erodes the mortar and this leaves some space between the bricks. Keep in mind that mortar lasts for 25 years whereas bricks can keep holding a structure for 50 years or more. This means that mortar will need to be filled much earlier than replacing the bricks. For this purpose, tuckpointing is done.
Reasons To Tuckpoint Your Chimney
Tuckpointing Stops Or Reduces Water Leaks In A Chimney
Mortar is filled between bricks. Due to mortar deterioration over time, storms, insects, or any other reason, gaps between bricks are exposed. With these gaps, moisture can easily get into the chimney system and cause problems like brick damage, flue cracks, and damage to the paint, drywall, plaster, and paneling.
Tuckpointing can stop these issues. However, keep in mind that a chimney leakage can be due to different reasons. One of them is damaged mortar. If your chimney is leaking due to crown damage, chimney cap problems, or any other, you should fix these issues along with checking the mortar.
It Prevents A Complete Chimney Collapse
Mortar wears off more quickly than bricks due to moisture, winds, insects, and other elements. If the deteriorated mortar is not replaced with new mortar, brick spalling will occur. This can then result in a complete collapse of the chimney. You will need to rebuild the chimney if you ignore tuckpointing and the signs of mortar damage.
By acting quickly and tuckpointing your chimney, you can save your chimney and save money as well because rebuilding a chimney cost more than tuckpointing.
Increases The Life Of Your Chimney
As tuckpointing refreshes the joints between the bricks, the structural stability of a chimney is maintained. This makes the chimney strong enough to withstand harsh weather better.
Improves The Aesthetics
Mortar damage can lead to discoloration and damage to the bricks. The discoloration and stains on the chimney may be visible from afar affecting the aesthetics of your house. Tuckpointing can fix the damage and also sustain the original color of the mortar and joints.
This is more helpful for people who are looking to sell their house. A clean and pretty chimney along with other parts of the house will put you in a better position when settings the price of the house.
Steps To Tuckpoint Your Chimney
- For tuckpointing, you should first inspect the chimney. Use a ladder to reach the chimney or get on the roof for the inspection. Take a water-soluble marker with you. Look for spaces between bricks, cracks in the mortar, and loose or soft mortar. Mark the areas with the marker.
- After marking, you should remove the mortar that you think is loose, cracked, or powdery. Keep removing it until you touch solid mortar under or behind the damaged mortar. Use a tuckpointing tool or a thin blade for removing damaged mortar.
- When removing damaged mortar, make sure to not remove more than 30% depth of the brick as it can cause instability.
- Select mortar type, cement content, and compression strength. These things should be the same as the existing mortar of your chimney. This is because if you use stronger mortar in an older chimney, it can lead to the breaking of the bricks due to the change in load factors.
- After the selection, mix the mortar in a container. Use prepared mortar and add water. Keep adding water till the mortar is thin enough so you can fill the bricks with it easily but thick enough that it can stay on a trowel without flowing anywhere.
- Read the instructions to know how much time you will need it to sit and hydrate. Moreover, to stop the mortar from drying during use, keep adding small quantities of mortar to the mixture if you see it drying. However, if the mortar becomes too crumbly, make a new batch.
- Use a container to collect some mortar from the bigger container. Take mortar and other tools with you and reach the chimney.
- Dampen the parts where you will add new mortar. You can use a regular hose for dampening all the parts of the chimney that will be tuckpointed.
- Use a pointing trowel and fill the joints, from where you removed mortar, with new mortar.
- Fill the gaps fully. If a gap is bigger, don’t only add mortar once. Add mortar until the whole gap is completely filled.
- After filling all the gaps, you should shape the new joints as the older joints. Use a steel finishing tool that has a convex tip for this purpose. The end of the tool can be dampened for a better shape of the mortar.
- Clean unnecessary mortar off the bricks with a wire brush if it’s dried.
Signs Your Chimney Needs Tuckpointing
Frequent inspections of your chimney will allow spotting the signs of mortar damage. Consult a chimney repair Columbia MD service if you see any of the below signs so they can guide you through the next steps.
Damaged Drywall
Wearing of the mortar between the bricks leaves gaps there. Water enters from these gaps and leads to leaks. A chimney leak can affect the surrounding walls of the chimney as well. So, damaged drywall means that the chimney is leaking. A leak can be due to many reasons, but usually, it’s due to damaged mortar.
Rusty Firebox Or Damper
Another sign of a chimney leak and a possibility of mortar damage is a rusted firebox or damper. Chimney leaks are not noticeable that easily, but if the firebox or damper shows signs of rust, then you should consider chimney repairs.
Discolored, Soft, Flaking, Or Cracked Mortar
Elements like weather and water deteriorate mortar. This will change the color of your chimney mortar. Additionally, this can cause flaking, softness, and cracks in the mortar. Discoloration may be detectable from the ground as well. So, if you see discoloration, give it a close inspection. If you spot other mortar damage and many gaps between the bricks, you should tuckpoint the chimney.
Spalling Bricks
This is a severe form of mortar damage. If the mortar keeps deteriorating, leaving gaps between bricks, at one point, the gaps will be enough to cause spalling bricks. It can be due to the freeze-thaw cycle or any other reason.
Conclusion
With tuckpointing, you fix the gaps created due to the deterioration of the mortar. Tuckpointing can maintain the structural stability of your chimney and prevent or reduce water damage. For tuckpointing, make sure to use a mortar that matches the existing mortar in color and cement content. Lastly, get in touch with chimney contractors Upper Marlboro for a chimney inspection and tuckpointing.